Showing posts with label Paint. Show all posts

Tuesday, February 15, 2011

Drab 2 Fab: My Sister's Room Transformation

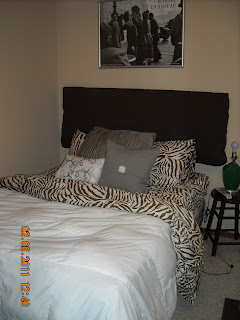
Let me just start by saying that my sister, Melanie Brooke aka Tooty, is one of my favorite people in this whole world. My sister is absolutely gorgeous. A few words to describe her: loyal, trusting, fashionable, giving, and tender. I love my sister. But, my sister is NOT organized. I am featuring her room in today's blog. Normally, I like to post "before" and "after" pictures. Today we will only have "after" pictures because I honestly just feel "before" pictures would damage any possibility of Tooty one day being accepting into college and even getting a good job 5 years from now. It was THAT bad. Have no fear; Heather came to the rescue and took control of this out-of-control situation.

It all began with Tooty sitting on her bed talking to me. I couldn't hear anything she was saying because I was all too focused on her chaotic and disastrous bedroom. She has had a girly pink, black & white, zebra themed bedroom for a few years now. Her walls were gray- which was the color I painted it when I lived in her room, ummm... many years ago. It was time for a change. Time to FAB her up! I stopped her mid-conversation and said "Tooty, we really need to re-do your room... Here's what I'm thinking..." 

Phase 1: The Headboard
This was a project I've been wanting to do for quite some time. We ran over to my Grandma's and started going through Poppa's storage shed looking for materials. Tooty found two long pieces of boards and we I got right to work!

To hold the two pieces together, we used heavy duty duct tape.


Next up, we needed some padding between the fabric and the boards. Grandma found an old egg crate. Perfecto! I trimmed it down to fit the boards.


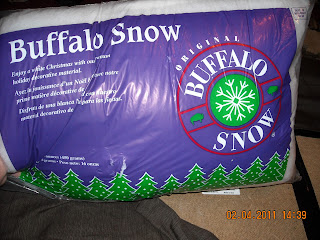
The egg crate didn't provide enough stuffing, we found a bag of "Buffalo Snow" leftover from Christmas out in Grandma's storage shed. Same thing as poly-fil when it comes to this project.


Next up, we used the stapler to pull the fabric around the boards. Our plan was to get a printed fabric at Hancocks for abotu $20 bucks. Before we went, we stopped by Dirt Cheap to pick up a few decorative items. I happened to pick up a piece of brown fabric and wondered how much it was. Tooty and I couldn't figure out what it exactly was, but we knew it would be cheap and perfect. Turns out, it was a TABLE cloth, and $4.00. Oh yeah!


AFTER
Phase 2: The Dresser
Everybody has an old dresser somewhere in their house. Tooty has always hated this dresser. When I suggested painting it, she was immediately on board. She said she didn't care what we did but the CLOWN drawer pulls were coming off and she didn't care what she had to spend to replace them. She is so funny!

BEFORE:

Crackle Medium Paint: Sherwin Williams $21.00
Brown Base Paint: $3.88 Walmart Clearance Aisle
Creamy Top Coat Paint: $4.45 Walmart Clearance Aisle
Bedroom Wall Paint: $3.88 Walmart Clearance Aisle


AFTER:


Blue Curtain Panels: $4.00 each at Dirt Cheap.


Gorgeous Vintage Chair Tooty found at Goodwill for $20, I think. I tried everything I could to bribe her into giving me this and the lamp on her dresser, which she also found at Goodwill. She wouldn't cave.


We didn't have time to get a nice curtain rod, night stand, and shade for the night stand lamp. So, these aren't FINAL pictures, but it gives you a really good idea of what it will look like.


For about $50 we totally re-vamped this gorgeous room! New headboard, curtains, dresser, mirror and wall paint.

HOW FAB is that?!!!

Wednesday, February 9, 2011

Drab 2 Fab: Dresser / TV stand

I've been looking for a dresser for the TV in our bedroom to sit on. I came across this beauty at goodwill about a month ago for $10.


Instead of staining it the same color as our bedroom furniture, I decided to make it an accent piece. Here's what I used for this project:


 I painted the base color dark brown.


Next, I used my new found love that I introduced you guys to in my last Drab 2 Fab post: Sherwin Williams Faux Finish Crackle glaze.


Here's where things got interesting.  I wanted the top coat to be an antique white. After rummaging through my storage shed I was very disappointed to realize I didn't have an antique white. The closest thing I had was high gloss white. I was determined not to spend more than $10 on this dresser and just use what I had, so, that's when my "crafty/creative" side of me kicked into high gear.
 
I brought the white paint in, poured it into my hand held paint bucket (my third favorite tool). Then, I took my dark brown paint and poured a very small amount into the WHITE paint. *when you don't have a paint mixer... improvise*


The paint turned pink. I knew I needed to keep adding white to get the color combination I was looking for, BUT the paint bucket was full. Any other day I would have been able to find five big empty buckets in one of our two storage sheds, but of course, not today. Now what?

When I walked back into the house I noticed my empty Gain laundry detergent container sitting by the door waiting to go to the recycle bin. "Hmmmmmm..." 


Favorite tool number 4: Razor Blade.


It's all about using what you already have, guys! I continued to add white paint until I had the perfect creamy antique white. (I must admit, I was VERY impressed with myself when the color turned out so perfectly).


Khloe was with me every step of the way on this project. : )


Time to paint my personal custom color for the top coat.


Total Cost: $10.00

Monday, January 24, 2011

Drab 2 Fab: Side Table

I found this piece of junk side table at Goodwill for $4.99. I didn't know where it would end up once I was finished with it, but knew I could FIND somewhere for it for 5 bucks. 


Talk about DRABBY! The left inside wood was completely peeled back and needing some SERIOUS work.


I used my rotary sander and took it down to the original wood (forgot to take pic, sorry.) At this point, I still didn't have a real vision for the table, so I spray painted it black.


Once it was dry, I knew something else needed to happen to it. That's when I found some paint I've had for almost 4 years. Illusions Faux Finish Crackle. I got my fine sandpaper out did a quick rub over it and got to work.

Here's everything I needed for this project - Best of all, EVERYTHING here I already had from previous projects.

The hubby snapped a pic of me HARD at work. It's a tough life guys!


 Beginning to dry. Crackle has only started to begin.


BEFORE:

AFTER:

This fabulous piece now has a new home in the Guest Bedroom. I am SO in love with it!!


TOTAL COST: $5.00

This is a SUPER easy project after all the prep work. Here's how I did it:
  • Step 1: Apply Base Coat (whatever color you want to show through on the crackle)
  • Step 2: Apply Crackle Glaze. I used Sherwin Williams Illusion Crackle Medium.
  • Step 3: Apply Top Coat. I used Valspar Spa Blue.

THAT'S IT! The crackle does all the work for you! A-MAZING!!

Please, show me some love, leave a comment and tell me what you think!

Also, don't forget to "follow me!"